How We Set Up Our Home Media Server
Background
During the Thanksgiving holiday this year, we finally made up our mind to set up our own media server, and rip all the discs we bought over the years, so that we can stream our movie and TV show collection to our iPads and MacBooks, even when we're not at home.
Although there are numerous NAS products in the market, we decided to build our own media server from scratch. There are two main reasons for it. First, as programmers, we always prefer a more hands-on experience. Second, almost all NAS products in the markets come with RAID by default, which is an overkill for our use case. Since we already have the physical discs as redundancy, we'd rather not pay for an additional RAID setup.
Hardware Setup
After some initial research, we found out that the new Raspberry Pi 4 that was released this summer could be a perfect pick as our server machine: it supports USB 3.0 and gigabit ethernet, and has a relatively larger memory than all previous generations (4 GB). Most importantly, it's really cheap: a complete kit on Amazon costs less than $80!
In terms of storage, we used this extremely helpful website diskprices.com to compare the prices of large desktop hard drive with more than 10 GB capacity, and eventually bought a WD hard drive at BestBuy.
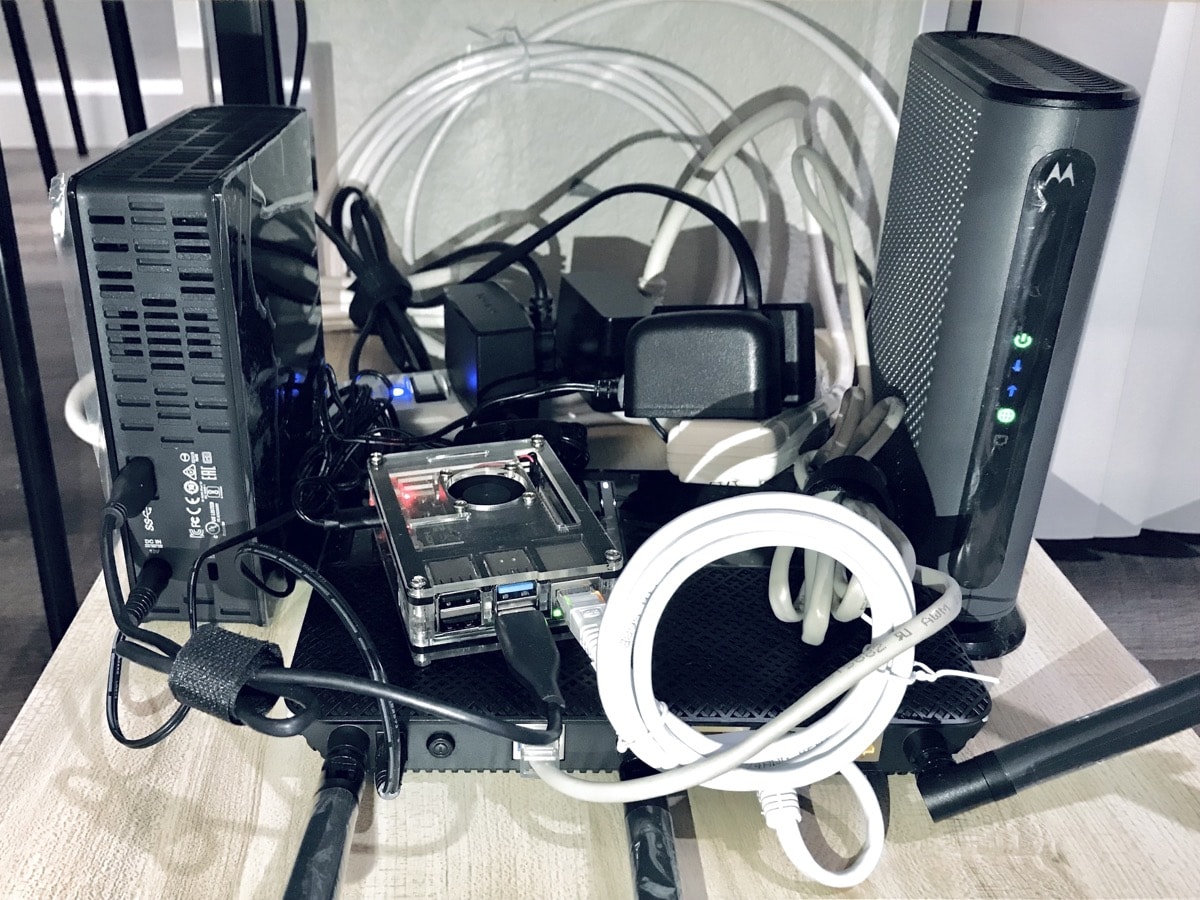
As shown in the picture above, the hardware setup is really not complicated. We connected the Raspberry Pi is directly to our 1733 Mbps Wi-Fi router via a Cat5b ethernet cable, and the hard drive is connect to the Raspberry Pi via a USB 3.0 cable.
Filesystem
We formatted the hard drive as NTFS at first, so that we can easily move files from our Windows PC into the hard drive. Since Linux does not natively support NTFS, we had to install a third party package called ntfs-3g so that the drive can be mounted with both read and write access.
However, this plan didn't go well. After the initial setup, we found out that the ntfs-3g package easily maxed out the CPU on the Raspberry Pi during large file transfer, and the resulting write speed is as low as 10 MB/s. Since we already tested on the Windows PC that the hard drive is able to handle read/write at about 200 MB/s, we know for sure that the problem is on the Raspberry Pi.
After doing a lot of research on the Internet and trying different configurations for ntfs-3g, such as using the --big_writes flag, we still got no luck. It turned out that the ntfs-3g package was actually performing as expected, and it's just the Raspberry Pi's CPU lacks the required amount of processing power. So, we had to try another approach.
In our second attempt, we reformatted the hard drive into Linux's native Ext4. Even though now it's inconvenient to transfer files from the Windows PC to the hard drive, fortunately it's a one-time job, and we won't need to worry about this after we have the media server fully set up.
Also, this time we used the dd command to benchmark the I/O speed before setting up everything else. Given that the mount point is /mnt/drive, to test the write speed:
dd status=progress bs=1024 count=1000000 if=/dev/zero of=/mnt/drive/zeroTo test the read speed, first create a large file:
truncate -s 1G /mnt/drive/example_1gThen run the dd command in reverse:
dd status=progress bs=1024 count=1000000 if=/mnt/drive/example_1g of=/dev/nullThe result was that both I/O speed are stable at about 70 MB/s. It was not ideal, of course, but definitely more than enough for our use case.
File Sharing Protocol
Since the beginning of the project, we had thought about trying a few different file sharing protocols:
- FTP
- SFTP/SCP/SSHFS
- Samba
We first tried SFTP, because we had been using SSH to configure the Raspberry Pi from the very beginning, and SFTP/SCP do not require any additional setup.
However, this protocol didn't work well. A simple file transfer test showed that the transfer speed of SCP was capped at about 15 MB/s.
Since we have previously learned that even the ntfs-3g package was beyond the Raspberry Pi CPU's capability, we were really not surprised that SCP had a poor performance as well. After all, using the SSH protocol to transfer files would cause a lot of overhead due to encryption/decryption, and hence it's probably even more computationally intensive than file I/O on an NTFS disk.
Hence, we instead set up a Samba server, and this time we were able to achieve a max speed of 60 to 70 MB/s.
Benchmarking the Network Speed
Although we did see in htop that the CPUs on the Raspberry Pi were maxed out during SCP file transfers, we wanted to make sure that the bottleneck was indeed the CPU.
So, we used a tool called iperf3 to benchmark the max transfer speed of our Wi-Fi router. On the Raspberry Pi, we started a iperf3 server daemon:
iperf3 -s -dThen, on our MacBook Pros and Mac Minis, we tried benchmarking the two-way transfer speed:
# one-way transfer from Macs to Raspberry Pi
iperf3 -c raspberrypi.local

# one-way transfer from Raspberry Pi to Macs
iperf3 -c raspberrypi.local -R
Surprisingly, the iperf3 benchmark result showed that the maximum transfer rate between a any two devices on our home network was indeed in the range of 60 to 70 MB/s, and it was not the Samba protocol or the Raspberry Pi that capped the speed.
We were really shocked by this number, because we were expecting to achieve at least 100 MB/s transfer speed. Our Wi-Fi router was marketed as 1733 Mbps on the 5 GHz band alone. The Wi-Fi devices (mostly MacBooks) were directly facing the router without any obstructions, and they all support MU-MIMO.
Since we did not have a second computer with ethernet ports, we were unable to determine whether the Wi-Fi signal as the limiting factor, or just the router's routing speed. Anyway, considering the fact that our disk I/O speed was also capped at 70 MB/s, we were OK with the router, at least for now.
Remote Access Setup
So far, these step above only allowed us to stream our movie collection while we're at home, but we'd really love to be able to stream while we're away from home as well. For example, if we go on to a vacation, we'll maybe want to watch a movie after getting back to the hotel in the evening.
All the techniques I knew that could access resources behind a NAT generally fell into two categories - either port forwarding or VPN. Apparently, we don't like port forwarding, because it's unsecure. On the other hand, while a VPN is definitely secure, it's not quite easy to set up and maintain.
After trying searching different keywords on Google, we found a third party serivce called remote.it which does exactly we want.
First, it doesn't require any manual VPN setup at all. All we need was to install a daemon on the Raspberry Pi, so that it can persist a connection to the remote.it server.
Then, whenever we need to connect to our Raspberry Pi, we can simply run the remote.it app on our MacBook or even iPhone, and the apps automatically sets up a port we can use on localhost. Then, the traffic is entirely managed by the app.
We verified it worked by connecting our MacBooks to cellular hotspots. It worked like magic.
Lessons Learned
We indeed have learned at least two important lessons from this project.
First, theoretical performances of ports/protocols/standards are usually not achievable in the real world. This observation held true for the USB 3.0 ports, the ethernet ports, the Wi-Fi router and even the hard disk. So, benchmarking and testing are definitely needed when designing a system consisting of different hardware components.
Second, it's always better to identify the error/problem/bottleneck as early as possible. Not realizing that the ntfs-3g package had a 10 MB/s I/O speed bottleneck had cost us a few extra days to reformat the disk and re-copy the data. These extra efforts could have been completely avoided if we had run the I/O speed tests in the very beginning.
What's Next?
Now that we are finally able to stream our movie collection to our iPads and MacBooks, this is by no means the end of our exploration. While planning and executing this project, we had a few ideas for our future home server.
For example, if we are able to host an NAS with RAID at home, we'll probably be able to migrate away from Google Drive and Adobe Lightroom CC by running an OwnCloud server by ourselves.
Also, if we do run our own cloud server at home, we might want to use low-cost cloud archive services (e.g. Amazon Glacier or Microsoft Azure Archive) as a secondary backup.
However, that would definitely require better performance hardware, and a lot more dedicated efforts. We'll see what we can do in the future.